How to Play Judas Priest’s “Panic Attack”: A Heavy Metal Rhythm Guitar Masterclass
September 10, 2026
by eduardoLearn the rhythm guitar parts from Judas Priest’s “Panic Attack” through its downpicking, alternate picking, palm muting, string skipping, power chords and classic heavy metal phrasing.

In this lesson, we won't focus on the solos. We'll study the rhythm guitars in "Panic Attack" exclusively, turning its different sections into exercises in downpicking, alternate picking, palm muting, string skipping, and heavy metal phrasing.
It's easy to underestimate how influential Judas Priest's rhythm guitar work can be. In my opinion, if you want to play heavy metal, sooner or later you have to spend some time with their music, and they certainly have no shortage of material to study.
Even though "Panic Attack" is a recent song, it contains many of the ideas that have defined the band's language and eventually spread throughout the genre. I'm no Judas Priest expert, but several of these devices are already part of heavy metal's standard vocabulary. If you're going to learn them, you might as well go straight to one of their sources.
The song is played in Eb Standard. In the fingerings, I'll list the fret number first and the string number second. For example, 15.2 means the 15th fret on the second string.
The Intro as a Gatekeeper
The intro works almost like the song's gatekeeper because, honestly, it isn't easy.
The first movement has a pentatonic shape and begins at the 15th fret. As you would normally expect from this scale, there are two notes per string. The difficult part, however, is playing the notes stacked across different strings at the same fret. That also makes it a useful 1NPS exercise.
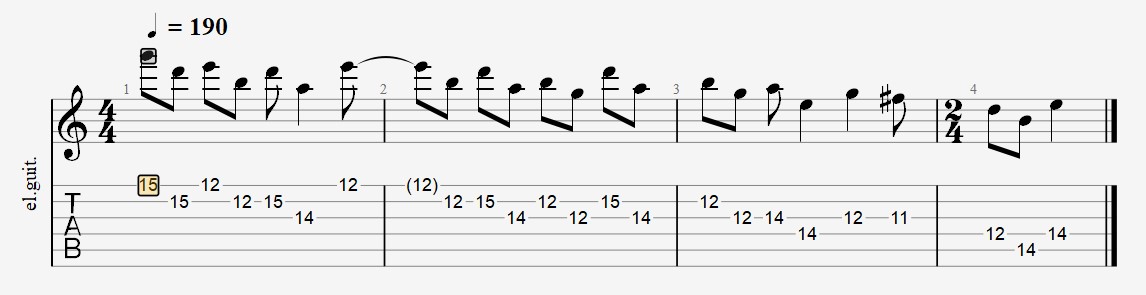
Learning the rhythm can be a nightmare. The figure loops around in a very particular way, and at first it can be difficult to understand where you are within it. With practice, the pattern begins to settle in and eventually you'll have it under your fingers.
At one point, the movement breaks away on the third string as you descend to the 11th fret. That note is F, the major second of Eb.
This entire first movement revolves around the scale of the root note. You then begin to move "up" toward the first string, where another section with several stacked notes appears.
Thumb Position
Before we reach that second section, let me save you some trouble: practice the entire first movement while paying attention to your thumb position, because it makes an enormous difference.
You don't want to lift your fingers too far. The closer they remain to the fretboard, the less movement you waste. Personally, placing my thumb roughly in the middle of the neck feels very comfortable when I play this section at the required speed.
Stay aware of your thumb and play the pattern with confidence. You'll get it.
Both the pentatonic movement and the following section can be played with alternate picking. You can begin with either a downstroke or an upstroke, depending on what feels more comfortable.
Fingering the Second Section
The other difficult section begins when you return to the 15th fret of the second string. Here, notes from the Eb harmony appear alongside stepwise notes, but the truly important part is deciding which fingers to use.
This fingering made it easier for me:
15.2: index finger.
16.3: middle finger.
17.2: ring finger.
16.3: middle finger.
15.1: index finger.
17.2: middle finger.
17.1: ring finger.
17.2: middle finger.
19.1: ring finger.
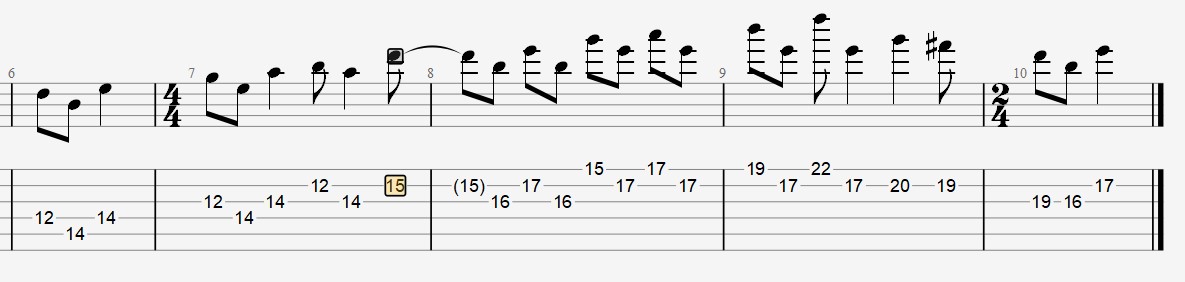
I begin on the 15th fret with my index finger, use my middle finger for the 16th, and my ring finger for the 17th. When I return to the note at the 15th fret, I use my index finger again because it is already close to that position.
I then return to the 17th fret of the second string with my middle finger. This frees the index finger to "correct" the position of the hand and begin the next figure comfortably.
This isn't the only possible fingering. It's simply the one that allowed me to arrange my fingers more naturally and made the entire movement feel smoother. Try it and adjust it according to what works best for your hand.
Old School Heavy Metal Downpicking
What comes next is a Judas Priest-style heavy metal lesson. The downpicking is intense and very old school, and it works on its own as a classic exercise for developing endurance, consistency, and accuracy.
Practice the riff slowly and make sure every downstroke lands where it should before trying to reach the original tempo. The intensity shouldn't come from tensing your arm, but from keeping your attack firm and steady.
You'll be able to practice this section and other parts of the song in the routine.
Verse Riff B: Alternate Picking and String Skipping
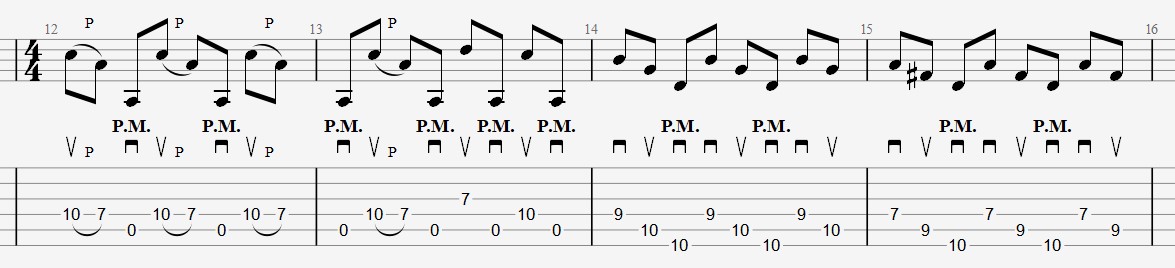
Verse riff B looks complicated because it packs several quick changes into a very small space. Once isolated, however, it can be divided into two movements.
Movement A: Constant Alternation and String Skipping
Begin the pull-off from 10 to 7 with an upstroke. When you return to the fifth string, play it with a palm-muted downstroke.
Maintain that alternation throughout the first part:
The upper notes are attacked with upstrokes.
The palm-muted fifth string is played with downstrokes.
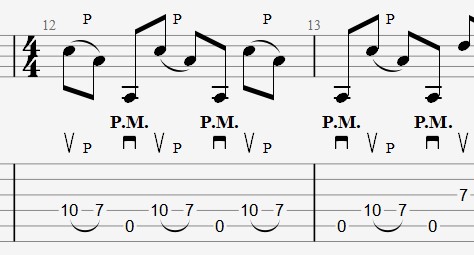
At first, you alternate between two adjacent strings. Then the string skipping appears: you have to play the 7th fret while skipping the fourth string, then return to the palm-muted fifth string.
Although the distance of the jump changes, your picking hand continues to do exactly the same thing: an upstroke on the note and a downstroke on the palm mute.
Practice this movement while keeping the speed of each jump consistent. The upstroke can create the sensation of speeding up, so make sure the attack doesn't get out of control.
Movement B: From the Pedal Note to the Chords
The second movement begins with this sequence:
Palm-muted downstroke on the fifth string.
Upstroke on the 10th fret.
Palm-muted downstroke on the fifth string.
Downstroke on the 9th fret.
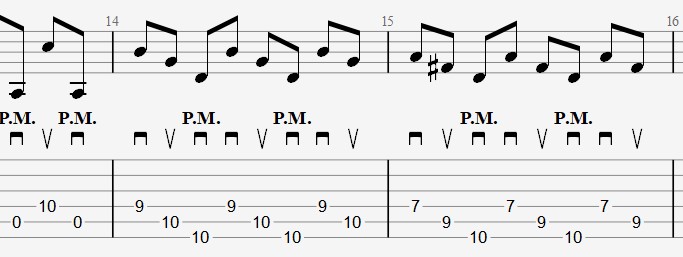
After that final palm mute on the fifth string, play the 9th fret again, but the picking strategy changes here.
Instead of playing the 9th fret again with an upstroke, enter with a downstroke. The previous attack on the fifth string leaves your hand in position to make another downstroke on the fourth string. This makes the transition into the first picked chord easier.
From there, you can play the chord with alternate picking and repeat the same picking pattern on the next chord.
The key is to practice the two movements separately:
Movement A: constant alternation between the notes and the palm-muted string, including the string skip.
Movement B: palm mute-10th fret-palm mute-9th fret-palm mute, followed by the change in attack that takes you into the two chords.
The Chorus: Legato, Fourths, and Power Chords
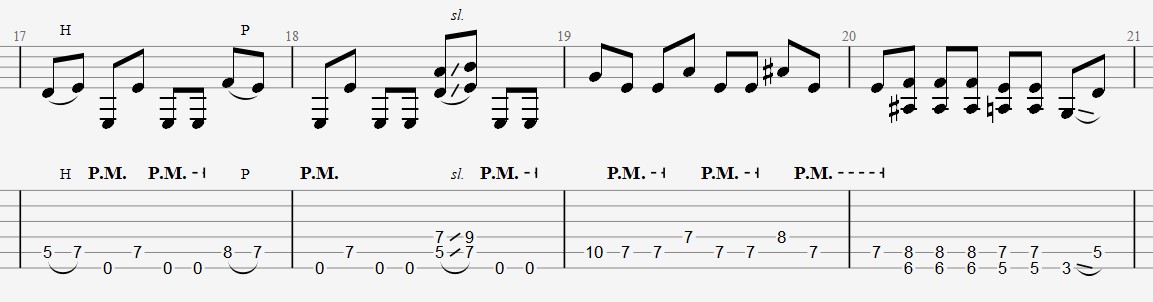
The chorus begins with a hammer-on and pull-off between palm-muted notes. Depending on how I arrive at this section, I sometimes end up with my ring finger on the 7th fret, which forces me to use my pinky, my weakest finger, for the pull-off. Other times, I reach the same fret with my middle finger and can perform it with my ring finger.
Honestly, both fingerings work. Try them and use whichever one allows you to connect this passage more smoothly with what you were playing before it.
This part can be tricky because of two short sections.
Movement A: Single Notes and a Fourth Double Stop
The first difficulty appears when you begin picking the individual notes. After playing the 10th fret, you need to form a fourth double stop at the 7th fret and immediately continue with the rest of the pattern.
The movement isn't that difficult if you place your index finger across the two strings involved, the fifth and fourth strings, from the beginning. This way, the finger is already prepared to play both notes at the 7th fret.
What can make it harder is trying to attack the notes too forcefully. Practice it slowly, firmly, and without creating too much tension. You'll find that the passage isn't particularly difficult on its own; the real challenge is connecting it to all the previous movements without losing the rhythm.
Movement B: Alternate Picking Across the Power Chords
After finishing the picked passage, you must move immediately into a sequence of power chords at the 6th and 5th frets.
I usually play each power chord with alternate picking: I move across its two strings as if I were strumming a chord instead of attacking both strings exclusively with downstrokes. It feels more comfortable to me and allows me to play the sequence faster.
The most difficult part of the chorus is probably leaving this series of power chords, playing only the 3rd fret, and then reaching the 5th fret on the next string without completing another power chord.
Your hand keeps almost exactly the same power chord shape. The only difference is that, at the end, you need to lift the finger that would normally play the fifth and let a single note ring. You don't need to learn a completely different shape; you just need to get used to removing one finger at the right moment.
Practice that final transition slowly and increase the speed as you gain control. Once the movement has been internalized, you'll be able to connect every part of the chorus with much more confidence.
Bridge I - Don't Choke Me Now: Palm Muted Notes
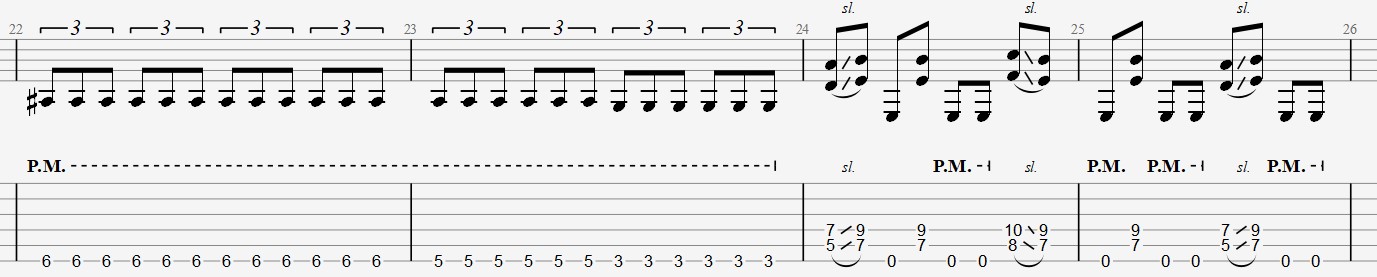
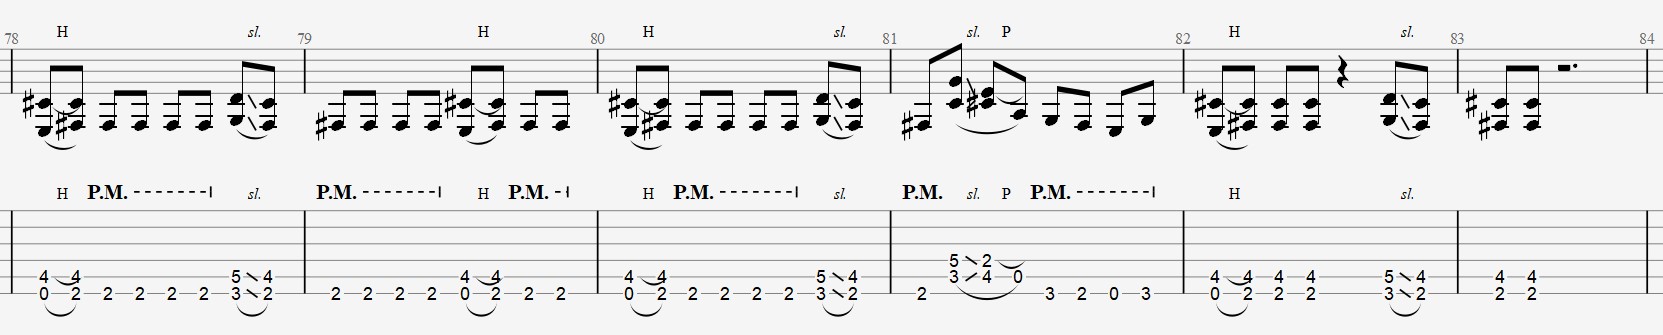
The first bridge consists mostly of palm-muted single notes, so it works as a great alternate-picking exercise on its own. It also includes a brief power chord section that interrupts the pattern and forces you to coordinate the change between individual notes and chords.
For this part, I recommend practicing directly with the tablature. Learn the rhythm first, then pay attention to the movement of the notes until both hands can execute the passage as coherently as possible.
Don't choke the attack too much. Even though the notes are palm muted, each one should sound defined. Avoid applying too much pressure with your palm or attacking the strings with excessive tension: let the notes breathe and focus on keeping the alternation even.
If you still can't reach the original speed, lower the tempo. First get the pattern sounding clean, coordinated, and defined. The speed will come as the movement becomes more natural.
Returning to the Main Riff
After the first bridge, we return to the main riff. Use this repetition to check whether you have truly gained control of its downpicking.
You don't need to study anything new, but you do need to maintain the same level of precision after coming from a section of alternate picking and individual notes. That change in technique is also part of the exercise.
Bridge II: Classic Heavy Metal Phrasing
After returning to the main riff, a second variation of the bridge appears. Unlike the first one, this passage doesn't use palm-muted notes and serves as a connection to the interlude, where we find a sequence of thirds.
You need to maintain a controlled rhythm in this section. Practice it as many times as necessary until you internalize both the phrasing and the movement between the notes.
To my ears, Judas Priest gives us a collection of classic heavy metal phrases here: movements that you can find in one form or another throughout the genre. It's worth treating them as practice material rather than seeing them only as a transition within the song.
This isn't a particularly complicated section, but it does require good coordination between both hands. Practice it slowly, allow each note to sound clearly, and increase the speed only when you can keep the rhythm steady.
This second bridge prepares us to enter the interlude and its sequence of thirds.
The Interlude: A Runway of Thirds
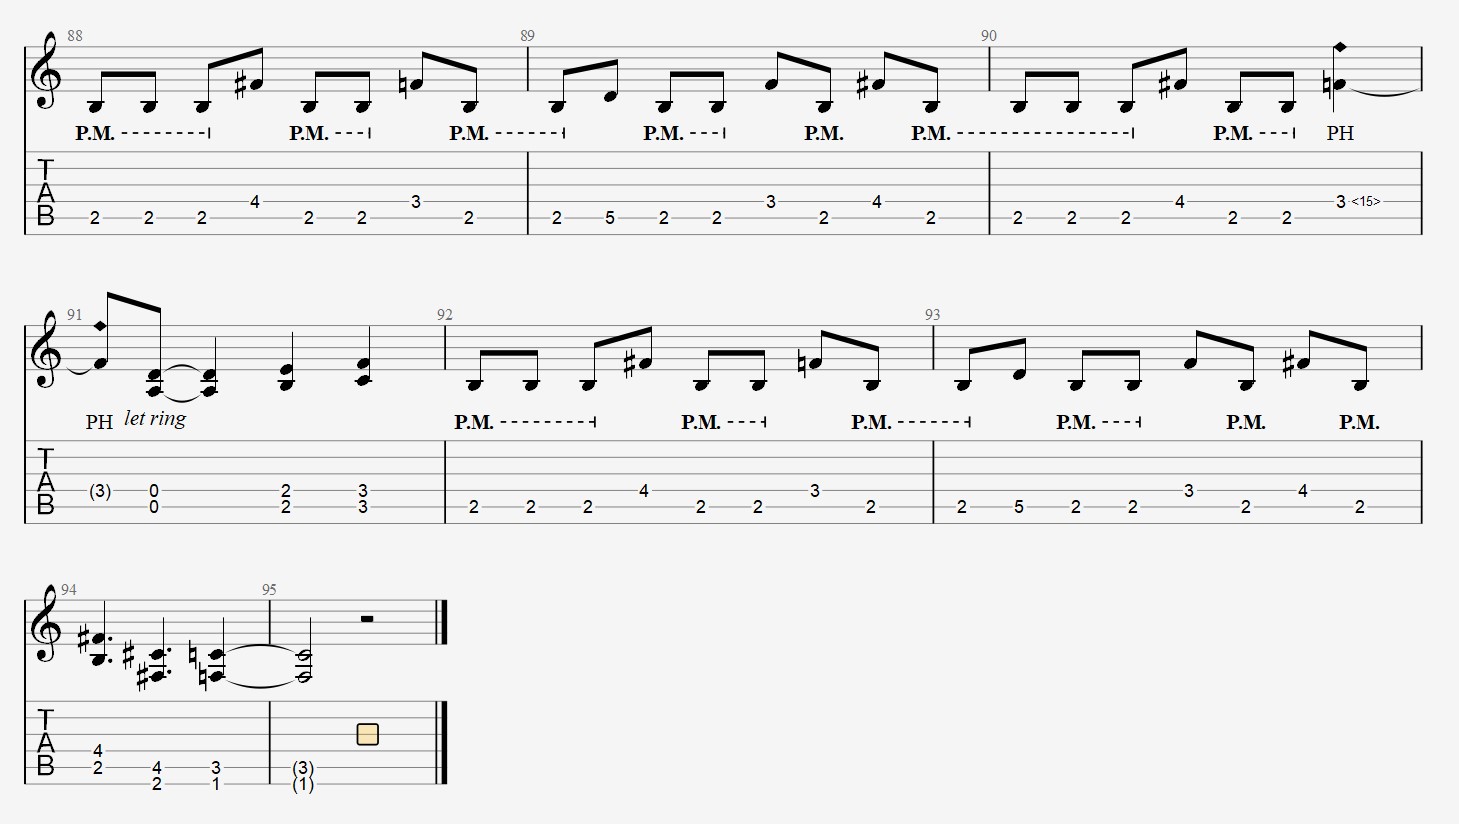
The interlude feels like a short lesson on how to use thirds within a heavy metal phrase. It's a runway that crosses a large part of the fretboard and can help you recognize and use the same device in future riffs and improvisations.
The first sequence consists of these pairs:
9.4 -> 10.5
7.4 -> 9.5
10.5 -> 7.5
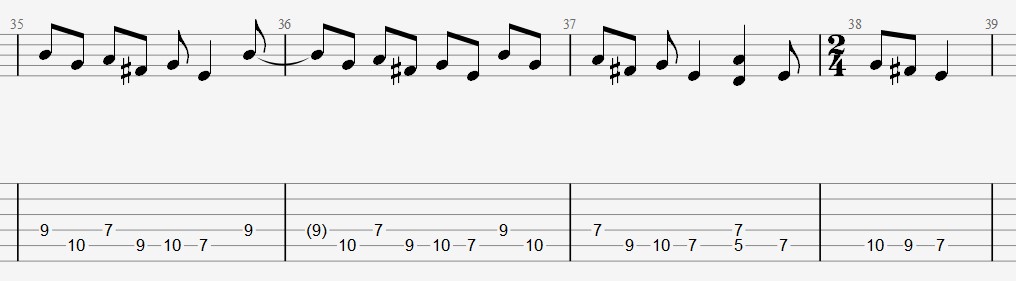
Technically, you're descending through the Eb minor scale in thirds. The pattern repeats three times before reappearing in another area of the neck, beginning around the 14th fret and descending all the way to the 2nd fret of the fifth string.
In other words, you end up covering a large portion of the fretboard with the same melodic idea.
Maintaining the Diagonal Movement
The difficult part isn't understanding what thirds are, but preserving the rhythm and speed while moving diagonally across the strings. You need to coordinate both hands so each pair of notes lands in place without interrupting the flow of the phrase.
Even so, the movement isn't particularly difficult. Practice it slowly, identify each pair, and increase the speed when you can move through the pattern without losing the rhythm.
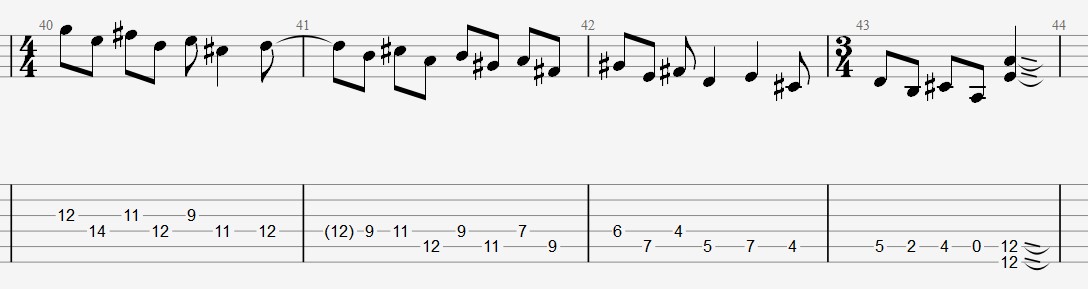
I wanted to point out that this is a sequence of thirds because you don't have to limit it to this song. You can transfer the same idea to other scale positions and incorporate it into your own riffs and improvisations.
This passage shows that practicing thirds doesn't have to sound like a mechanical exercise. When you turn them into a diagonal line across the fretboard, they can create phrasing that is clearly melodic and completely natural within heavy metal.
The Solos: A Festival of Guitar Riffs
Although we’ve reached the solos, we’ll continue focusing on the rhythm guitar, which brings back earlier movements with a few variations and changes in position.
Solo 1
Movement A: Root, Fifth, and Blue Note
The first movement uses the root as an anchor. In Eb Standard tuning, that root is Eb, and it appears both on the open sixth string and at the 7th fret of the fifth string.
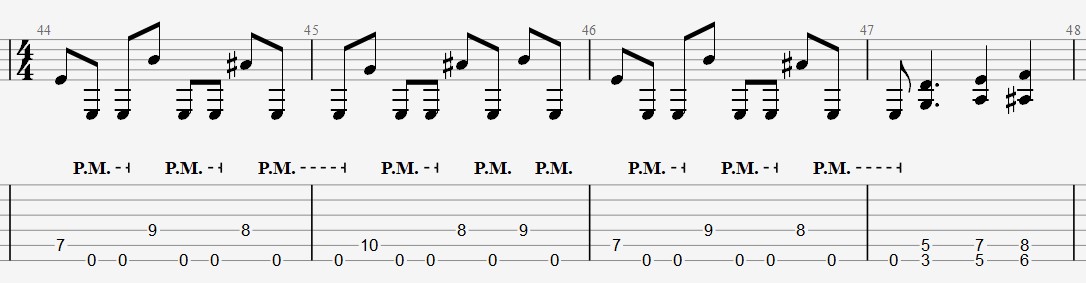
The perfect fifth is at the 9th fret of the fourth string. One fret behind it, we find the diminished fifth, or blue note. We then move down to the minor third at the 10th fret of the fifth string before retracing the same path back to the root.
The figure is simple, and the order of the notes follows an easy-to-recognize logic. Even so, you need to learn exactly where each repetition begins and ends. This allows you to anticipate the string changes and keep the pick from getting trapped between them.
Once again, this is a school of metal riffs. "Panic Attack" is really a festival of classic devices from the genre, so it's worth taking advantage of every one of them.
Movement B: A Familiar Bridge Variation
Next comes a movement similar to the bridge we practiced earlier. The central idea is almost exactly the same, but its ending changes slightly.
That means you don't need to study it as a completely new riff. Compare it with the earlier bridge, identify exactly where the ending changes, and practice only that transition until you can recognize it without losing the rhythm.
Solo 2
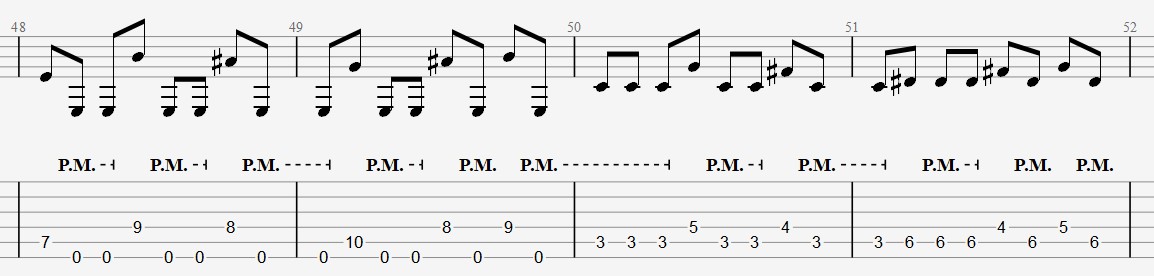
During the second solo, a very familiar phrase appears. Remember the "bouncing" motion from verse riff B, where we alternated a pull-off with a palm-muted string? Almost the same rhythmic device reappears here, but this time it is concentrated on a single string.
It's great to see how Judas Priest reuses the feel of an earlier riff without repeating exactly the same movement. This section can also work as an exercise for practicing the transition between alternate picking and downpicking.
Movement A: Alternate Picking and Downpicking
I use alternate picking during the first bar of the figure. When the riff settles on the repeated note at the 2nd fret, I switch to pure downpicking. This makes the transition feel comfortable and helps me preserve the rhythmic intention more easily.
You can also keep your index finger anchored at the 2nd fret of the fifth string and move only the finger you use to reach the 5th fret. This reduces left-hand movement and helps keep the figure stable.
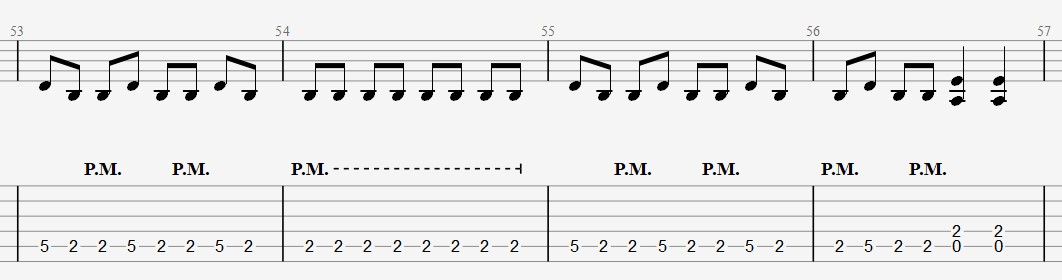
Practice these elements separately:
The movement between the 5th and 2nd frets with alternate picking.
The repeated 2nd fret with downpicking.
The transition between both picking approaches without losing the pulse.
Movement B: The Same Rhythm Applied to Thirds
The second part of the rhythm guitar begins the same way as the previous one. To close the passage, however, it moves a figure in thirds using the same rhythmic device you were already playing during the first bar.
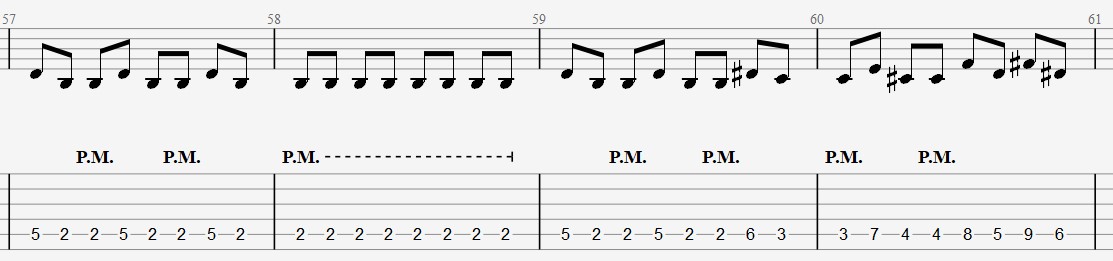
You don't have to learn a completely new rhythm. You need to preserve the same logic while the notes and the movement across the fretboard change.
Practice the ending slowly and analyze where each repetition begins. The goal is to move the figure in thirds without losing control of the pick or disturbing the rhythm you have already established.
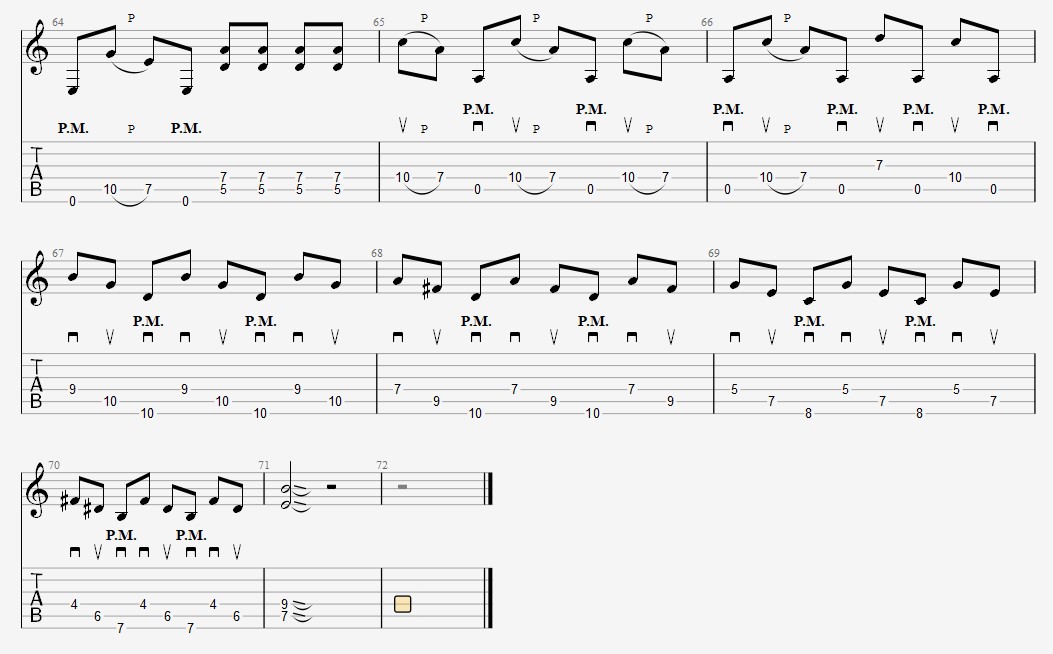
Solo 3
During the third solo, the rhythm guitar plays almost the same movement we found in the verse, accompanied by a few picked chords in the style we have already practiced.
The section should feel familiar. Only a few small adjustments appear at the end, so you don't need to learn a completely new figure. Focus on recognizing the differences and connecting the ending correctly.
Solos 4 & 5
The song then begins its transition toward the ending and culminates with two more solos. Don't worry: by this point, you already know nearly all of the rhythmic vocabulary that appears beneath them.
The accompaniment resembles the second bridge and the rhythm guitar from the first solo. The difference is that the figure we previously played on the fifth string is now moved to the sixth.
The location changes, but the movement remains the same. During solos 4 and 5, we aren't learning a new technique; we're moving a familiar figure to another part of the fretboard.
This is a good opportunity to test whether you have truly internalized the movement or merely memorized the frets. Once you recognize the rhythmic shape, moving it to another string becomes much easier.
The Outro: One Final Rhythmic Figure
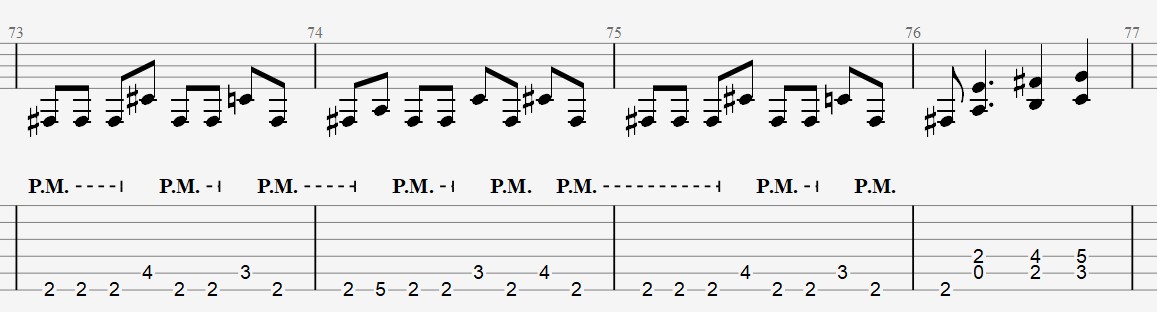
The outro does introduce something new, but it shouldn't give you too much trouble if you practice the rhythm and the placement of the notes separately.
The figure is simple, although it has a strange little detail at the end. If you want to stay faithful to the recording, I recommend keeping the pull-off instead of ignoring it or replacing it with a picked note.
First, form a power chord at the 2nd fret without directly picking the root. Let the open string ring while keeping the fifth in position, then drop your finger onto the 2nd fret.
Pay attention to the complete shape of the phrase because the rhythm matters just as much as the notes here. We're at the true ending of the song, and even a small displacement can make the resolution feel out of place.
The pull-off appears after the power chord slide. At the end of the shift, release your finger from the fifth string to let it ring and finish with that short little "tail" on the sixth string.
Practice the figure slowly, return to the beginning, and repeat it. Rinse and repeat. Once the movement and rhythm become a single unit, you'll have the end of the song under control.
A Heavy Metal Rhythm Guitar Masterclass
"Panic Attack" demonstrates how much practice material can be hidden inside a single rhythm guitar track. Throughout the song, we find old-school downpicking, alternate picking, palm muting, string skipping, power chords, and melodic sequences in thirds.
Many of these devices have been used so often in heavy metal that they may now seem commonplace. That is precisely why it's worth returning to Judas Priest and studying them at one of their sources.
You don't need to master the solos to get something valuable from this song. If you can internalize its riffs, control its string changes, and keep every attack defined, you'll have practiced a large part of heavy metal's essential rhythmic vocabulary.